How to Make a Video Game - Getting Started
It's not that long ago that you would need to be an experienced programmer if you wanted to create your own video game. Now, there is an abundance of free tools and learning resources available that make game development much more accessible.
One of the most important components of game development is the game engine. This is the framework on which a game is built and historically this is the first thing that would need to be developed. While many game studios still develop their own engines, many now make use of third party game engines, such as Unreal and Unity.
Unity is a great choice for beginners as it is free to use (as long as your studio is earning less than $100K per year), has a reasonably gentle learning curve, and has a strong developer community. In this tutorial we'll take a look at some of the capabilities of the Unity game engine and how to get started on your game development journey.
1. The first thing you need to do is download Unity. Navigate to the Unity homepage at http://www.unity.com and click on 'Get Started'.
2. Select the Individual Personal Plan and click on 'Get Started'.
3. Follow the prompts to install Unity Hub, which is a really useful application that allows you to access all your projects and all the versions of Unity installed on your machine.
4. Before creating anything in Unity you need to obtain a license. To do so click on 'Manual Activation' on the License management tab followed by 'Save License Request'.
5. Once you've saved the license request you'll be taken to the Unity website where you will need to create an account. Once completed you will be prompted to select the file you saved in the previous step. Follow the remaining prompts to obtain the license file for 'Unity Personal Edition'.
6. Back in Unity Hub you can now click 'Next' and select the license file you downloaded in the previous step. You are now licensed and can use all the features of Unity.
7. You now have Unity Hub and a license, but there isn't a version of Unity installed yet. To do so click on the Installs tab and click the 'add' link.
8. Select the latest version of Unity and follow the installation prompts, accepting all default options.
9. Once the installation completes (it will take a while!), go to the Projects tab and click the New button.
10. Create a new 3D project and name the project 'Getting Started'.
11. Once Unity has launched you'll see a screen with many panels. The first panel we'll explore is the Hierarchy panel on the left hand side. This panel displays a list of all the objects that are currently in your scene. At the moment there is a Camera and a Directional light.
12. Lets add a Cube to the scene by clicking the plus button on the Hierarchy panel and selecting 3D Object->Cube.
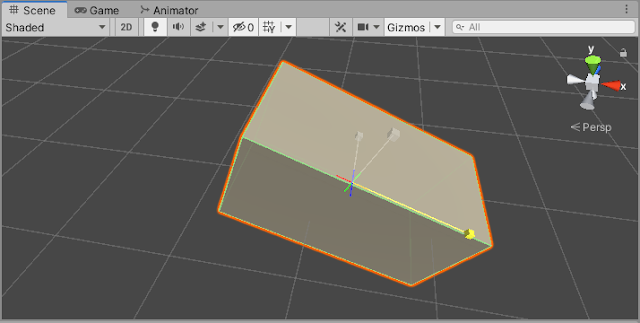
13. You'll see that a cube has now appeared in your Scene view. You can navigate around the scene view to get a better view of your cube using your mouse.
- Use the mouse wheel to zoom in and out or hold down Alt+Right mouse button and drag if you don't have a mouse wheel.
- Hold the right mouse button and drag to change the rotation of the view.
- Hold the middle mouse button and drag to move the view or hold down Ctrl+Alt+Left mouse button and drag if you have a two button mouse.
- Hold down Alt+Left mouse button and drag to orbit around the item.
14. Double click on the cube in the Hierarchy panel to focus the Scene view on the cube.
15. Select the move tool at the top left of the screen.
16. Click and drag on the coloured arrows to move the cube around the scene.
17. Click on the rotate tool.
18. Click and drag on the coloured circles to rotate the cube.
19. Click on the scale tool.
20. Click and drag on the coloured cubes to resize the cube.
21. The Inspector panel on the right hand side shows information about the selected game object. You'll notice that the changes made to the position, rotation and scale of the cube can be seen and edited here. Change these back to their original settings. Position (0, 0, 0) Rotation (0, 0, 0) Scale (1, 1, 1).
22. To see what the game currently looks like through the eyes of the game camera click on the Game tab.
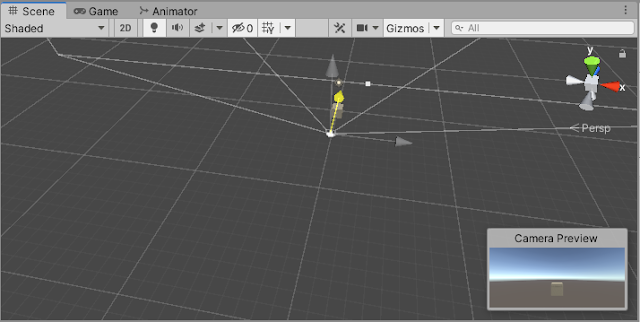
23. If we want to change the view of our game we can adjust the camera. Return to the Scene view and double click on 'Main Camera' in the Hierarchy panel. This will focus the scene view on the camera. Change the position and rotation of the camera in the same way you did the cube. As you move the camera you'll see the camera preview change.
24. Click back on the Game tab to see how it has changed based on the new position of the camera.
25. Another useful feature for setting the game camera is the ability to align it to what you can see in the Scene view. Navigate around the Scene view as you did in step 13 until you get a good view of the cube. Then, with the camera selected in the Hierarchy panel, select GameObject->Align With View from the main menu or use the shortcut Ctrl+Shift+F.
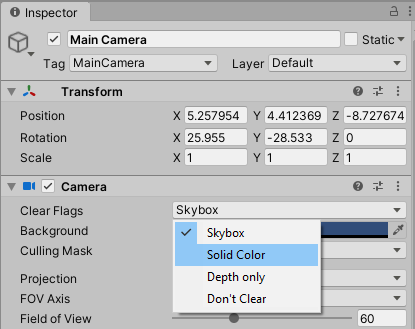
26. Switch to the Game view and you'll see that the camera has now been aligned to the Scene view. You'll also notice that there is an interesting looking background, with grey on the bottom half and a blue gradient at the top. This is Unity's default skybox which is used to represent the sky. It doesn't really fit with our current scene, so select the camera in the Hierarchy view and change the Clear Flags drop down in the Inspector panel to "Solid Color".
27. Click Background in the Inspector panel to bring up the colour picker and choose a colour of your liking. This colour will then be shown in the background in the Scene view.
28. Lets make the scene a bit more interesting by adding a Plane in the Hierarchy panel.
29. Ensure the Plane has no transformations applied by clicking on the three dots on the far right of the Inspector panel, followed by Reset.
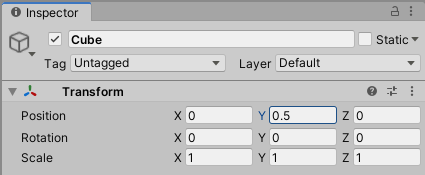
30. Position the cube on top of the plane by selecting it in the Hierarchy panel and setting the Y position to 0.5 in the Inspector panel.
31. Next we'll add a bit more colour to our scene. To do this we'll create some materials for our game objects. Materials can be added in the Project panel at the bottom of the screen. Click on the plus button in the Project panel and select Material. Name the new material 'Floor'.
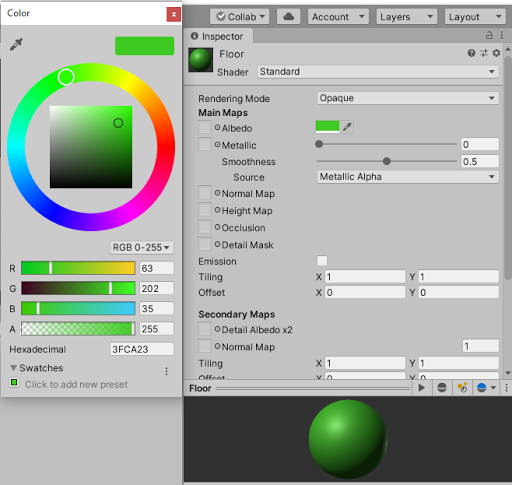
32. There are many settings that will change the appearance of a material, but for now set the colour by clicking on the box next to Albedo. Choose a green colour for the floor.
33. Drag the material from the Project panel on to the plane in the Scene view. This will assign the material to the plane so that it now appears green.
34. Add another material via the Project panel and name it 'Block'.
35. Set the Albedo colour to a yellow colour.
34. Drag the 'Block' material on to the cube in the Scene view to assign the material so that the cube now appears yellow.
35. A huge factor on the appearance of a game is the lighting. To improve the lighting in our scene select Window->Rendering->Lighting Settings from the main menu, and then click 'Generate Lighting'.
36. By default, the Auto Generate lighting checkbox is turned off as the process is quite intensive and can take a long time for complex scenes. As our scene isn't going to get too complex, click the checkbox to turn this on so that the lighting is regenerated every time you make a change to the scene. Once you've done this close the Lighting window.
37. We have a directional light in our scene which simulates the light from the sun. Click on the directional light in the Hierarchy panel and then increase and decrease the Intensity in the Inspector panel to see how it affects the brightness of the scene.
38. Set the Intensity back to 1 and select the rotation tool at the top of the screen.
39. Play with the rotation of the light and see how it affects the lighting and the shadows. The lower the rotation around the X axis the darker the scene gets and the longer the shadows get. This simulates the sun being lower in the sky.
40. Another useful feature is the ability to duplicate game objects. Right click on the cube in the hierarchy and select duplicate.
41. Reposition the new cube by setting the position in the Inspector panel to (0.5, 2, 0) and the rotation to (0, 0, 70).
42. Duplicate the original cube again and set the position of this one to (0, 3.5, 0) and the rotation to (-3, 0, 21).
43. Add a Sphere to the scene in the Hierarchy panel.
44. Set the position of the sphere to be (0, 5, 0).
45. Drag the Block material from the Project panel on to the Sphere to make it the same colour as the cubes.
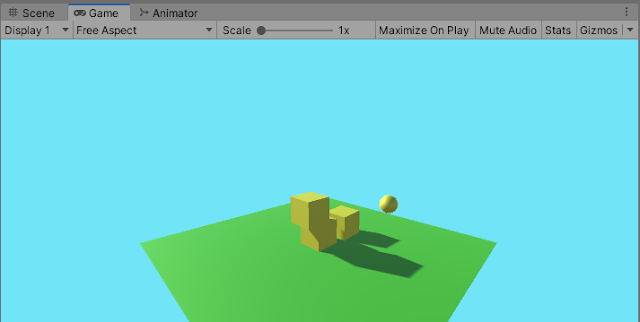
46. Position the Scene view so that all of the new objects are visible, then select the Camera in the Hierarchy panel and select GameObject->Align With View from the main menu to make sure everything is visible in the Game view.
47. Now switch to the Game view and press the Play button to start the game. You'll notice that nothing happens. The cubes and sphere remain suspended in the air. They are not obeying the laws of physics as we haven't told Unity they should be included in the physics system. Click the play button again to stop the game.
48. Let's add the sphere to the physics system. To do this, select the sphere in the Hierarchy panel and then click 'Add Component' in the Inspector panel. Search for 'Rigid Body' and select it. This will add the Sphere to Unity's physics system.
50. Press the Play button again and you'll see the ball now falls and rolls off the cube and plane.
51. Finally, let's add the cubes to the physics system as well. Hold down the Ctrl key and select all the cubes in the Hierarchy panel. With them all selected click 'Add Component' in the Inspector panel and add a Rigid Body. This will add a Rigid Body to all the objects selected in the Hierarchy panel.
52. Press Play again and you'll see that all of the objects now fall under gravity as you would expect.
That's all we're going to cover in this introductory tutorial. Hopefully it has given you a good insight into what Unity can do and how it can accelerate your game development. This has only scratched the surface, and in future we'll dig much deeper into it's features.
Please leave any questions or feedback in the comments below, and don't forget to subscribe to get notified when we publish our next post.
Thanks.










Can we make tample run apk from that tutorial? Or is this guide help me to build any type of game that is avaible on play store?
ReplyDeleteThis tutorial simplifies the gamedevelopment process, making Unity's features accessible for beginners to create a basic yet engaging game scene. 🎮
ReplyDelete