Posts

Showing posts from July, 2020

The Benefits of Prefabs - Unity Game Development Tutorial

Image
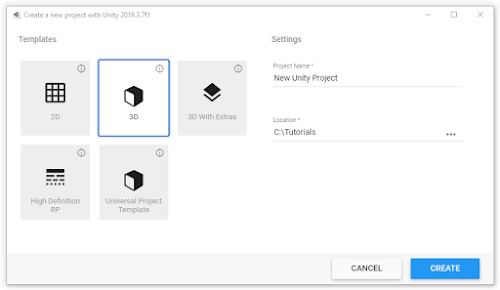
In this Unity game development tutorial we'll be looking at how to make the most out of the prefab system. The prefab system lets you store a GameObject and all of it's configuration as a reusable asset. If you want to have more than one instance of an object in a Scene or you want to use an object in multiple scenes, then you'll want to store that object as a prefab. 1. To get started let's create a new 3D project in Unity Hub. 2. Add a Plane to the scene by clicking the plus button on the Hierarchy panel and selecting 3D Object->Plane. We're going to use this plane to represent our floor. 3. Create a new empty game object by clicking the plus button on the Hierarchy panel and selecting Create Empty.  4. Rename the new empty object to 'House' in the Inspector panel. 5. We're going to use this empty object to group lots of other objects together. Start by adding a cube by right clicking on the 'House' in the hierarchy and selecting 3D Object-&

Unity Quick Tip - Set Play Mode Tint to Prevent Accidental Loss of Changes

Image
One thing in Unity that catches many people out is the fact that any changes made while in play mode will be discarded once the game is stopped. If you forget you are in play mode it could lead to a lot of lost changes! In this Unity quick tip we'll show you how to change the colour of the UI when the game is in play mode. This will make it more obvious and much more difficult for you to accidentally lose changes. 1. Create or open a Unity project. 2. Open the preferences window by selecting Edit->Preferences... from the main menu. 3. Select the Colors tab. 4. Click on the Playmode tint colour selection and choose a colour that will stand out, such as green. 5. Click the play button to enter play mode, and you'll see the UI is now tinted in the colour you selected That covers everything for this tip. We hope that you found it useful. Please leave any questions or feedback in the comments below, and don't forget to subscribe to get notified when we publish our next post.

Pointing in the Direction of Movement - Unity Game Development Tutorial

Image
In this Unity game development tutorial we'll look at how we can rotate an object so that it is facing in the direction it is moving. 1. To get started let's create a new 3D project in Unity Hub. 2. Add a Plane to the scene to represent our floor by clicking the plus button on the Hierarchy panel and selecting 3D Object->Plane. 3. We'll use a capsule to represent our player. Add this to the scene by clicking the plus button on the Hierarchy panel and selecting 3D Object->Capsule. 4. Set the position of the capsule to (0, 1, 0) in the Inspector panel to position it on top of the plane. 5. Right click on the capsule and click 3D Object->Capsule. This will create another capsule that is attached to the original one.  6. We'll use this to show which way we are facing. To do this set the following transformations on the  the new capsule. You should now have a capsule with a smaller one protruding. 7. The next thing we need is a script to contain our logic. To do thi

Unity Quick Tip - Shortcut to Maximise a view or panel

In this Unity quick tip tutorial we'll show you how to quickly maximise a panel or view so that it fills the UI. This can be particularly useful if you're working on a smaller resolution display. 1. Create or open a Unity project. 2. Mouse over the panel or view you want to fill the screen. 3. Press Shift + Space and the panel or view will maximise to fill the UI 4. Press  Shift + Space again and the UI will return back to the previous layout. That covers everything for this tip. We hope that you found it useful. Please leave any questions or feedback in the comments below, and don't forget to subscribe to get notified when we publish our next post. Thanks.

Simple Movement using Gamepad and Keyboard - Unity Game Development Tutorial

Image
In this Unity game development tutorial we'll look at how we can process player input from a gamepad or the keyboard and use that to move an object within the game. 1. To get started let's create a new 3D project in Unity Hub. 2. Add a Plane to the scene to represent our floor by clicking the plus button on the Hierarchy panel and selecting 3D Object->Plane. 3. We'll use a capsule to represent our player. Add this to the scene by clicking the plus button on the Hierarchy panel and selecting 3D Object->Capsule. 4. Set the position of the capsule to (0, 1, 0) in the Inspector panel to position it on top of the plane. 5. In order to process the player input and use it to make the capsule move we need to create a C# script to contain our logic. To do this click on the 'Add Component' button in the Inspector panel, search for script and click 'New Script'. Call the new script PlayerMovement. This will create a script component attached to the capsule. 6. Do