Controlling a Character - Unity Game Development Tutorial
In this Unity game development tutorial we're going to look at how we can use the Character Controller component to move a character around a scene and have them collide properly with obstacles.
You can either watch the video version below or continue reading for written instructions.
Right, we'll start with this scene that has a character we can move and rotate.
We created this scene in our post on 'Gamepad Input', so take a look if you want to know how it was done.
Previously, we've covered the basic movement, but so far we haven't taken into account any obstacles our character may face.
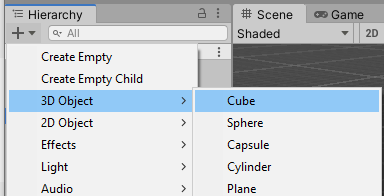
Let's add something to collide with by clicking the plus button on the Hierarchy and selecting 3D Object->Cube.
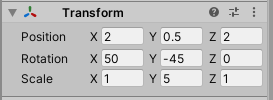
We'll change the Transform of the cube to match the following
Let's press play to see what happens.
Our character passes straight through the wall.
This is expected as we haven't told Unity to include the character in it's Physics calculations. One way we could do this is by adding a Rigidbody component to the character as we did in our 'Collisions' video. The other option is to add a Character Controller component. As you might have guessed from the name, this is a component designed specifically for controlling characters.
Let's stop the game to add this to our character. To do this, we'll select the character in the Hierarchy. Then we'll click 'Add Component' and search for the Character Controller component.
You can see this has now added what looks like a capsule collider to our character. This will be used to detect collisions so we need to make it fit the shape of our character as best we can.
To do this, we'll change the Centre of our Character Controller to 0.6 on the
Y axis and we'll change the height to 1.
Now we need to change our script to make use of the character controller when moving. Let's double click our Player Movement Script to open it in Visual Studio.
Currently the script looks like this.
using UnityEngine;

public class PlayerMovement : MonoBehaviour
{
    public float speed;
    public float rotationSpeed;

    void Start()
    {
    }

    void Update()
    {
        float horizontalInput = Input.GetAxis("Horizontal");
        float verticalInput = Input.GetAxis("Vertical");

        Vector3 movementDirection = new Vector3(horizontalInput, 0, verticalInput);
        float magnitude = movementDirection.magnitude * speed;
        movementDirection.Normalize();

        transform.Translate(movementDirection * speed * Time.deltaTime, Space.World);

        if (movementDirection != Vector3.zero)
        {
            Quaternion toRotation = Quaternion.LookRotation(movementDirection, Vector3.up);
            transform.rotation = Quaternion.RotateTowards(transform.rotation, toRotation, rotationSpeed * Time.deltaTime);
        }
    }
}
We're getting the amount of input on the horizontal axis and vertical axis. By default, in Unity these are mapped to the arrow keys, the WASD keys, and the gamepad left thumbstick. We then take this input and use it to create a movement direction vector, with the horizontal input used for the X axis and the vertical input used for the Z axis.
We combine this vector with our speed to determine the magnitude of movement. We then normalise to ensure the direction vector has a magnitude of 1. Then we move our character in this direction at the specified speed using the transform Translate method.
The next section handles the rotation of the character.
First we check if we are moving. If we are, we create a rotation looking in the direction of movement. Then we rotate towards this at the specified rotation speed.
OK, let's look at how to change this script to make use of the Character Controller component.
The first thing we need to do is get a reference to the component.
We'll add a new private field for the Character Controller, and we’ll get this in the Start method.
using UnityEngine;

public class PlayerMovement : MonoBehaviour
{
    public float speed;
    public float rotationSpeed;

    private CharacterController characterController;

    void Start()
    {
        characterController = GetComponent<CharacterController>();
    }

    ...
Now we can remove the line that moves the character, and we can replace it with a call to the Simple Move method of the Character Controller. We'll pass in the amount of movement we want, which is the movement direction multiplied by the desired magnitude.
using UnityEngine;

public class PlayerMovement : MonoBehaviour
{
    public float speed;
    public float rotationSpeed;

    private CharacterController characterController;

    void Start()
    {
        characterController = GetComponent<CharacterController>();
    }

    void Update()
    {
        float horizontalInput = Input.GetAxis("Horizontal");
        float verticalInput = Input.GetAxis("Vertical");

        Vector3 movementDirection = new Vector3(horizontalInput, 0, verticalInput);
        float magnitude = Mathf.Clamp01(movementDirection.magnitude) * speed;
        movementDirection.Normalize();

        characterController.SimpleMove(movementDirection * magnitude);

        if (movementDirection != Vector3.zero)
        {
            Quaternion toRotation = Quaternion.LookRotation(movementDirection, Vector3.up);
            transform.rotation = Quaternion.RotateTowards(transform.rotation, toRotation, rotationSpeed * Time.deltaTime);
        }
    }
}
Note that we don't need to multiply by Time.deltaTime as adjusting for frame rate is built into the Simple Move method.
Let's save this script and switch back to Unity.
We'll press play to try it out.
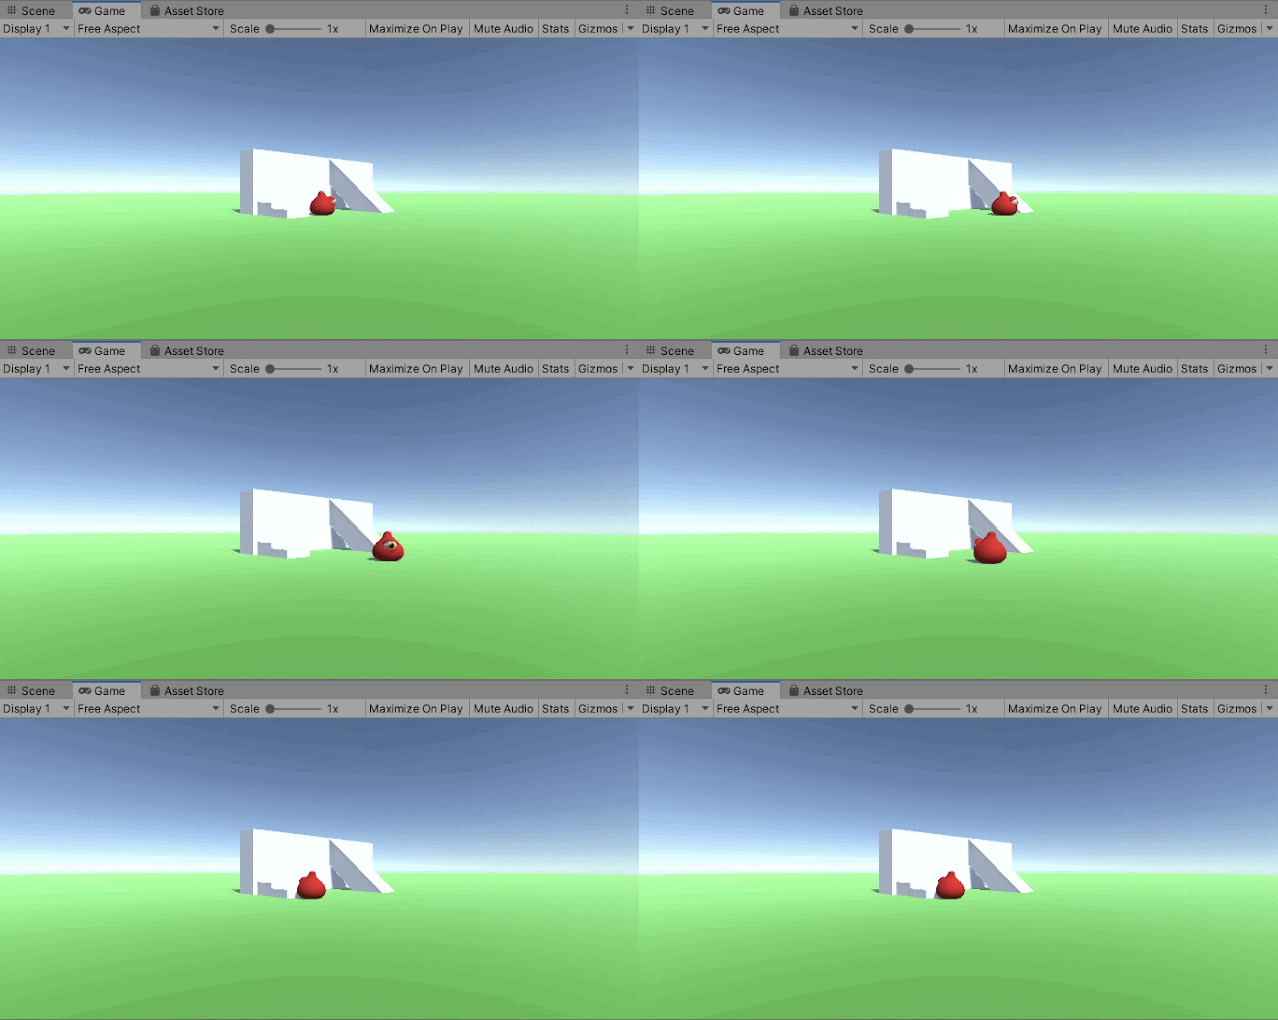
Now our character collides with the wall and slides along.
That's covered the collisions but there are a couple of other features of the Character Controller worth looking at.
If we select our character in the hierarchy, we can see we have a Slope Limit and Step Offset. These control how steep a slope the character can go up and how high a step up it can do. So at the moment, it can go up a slope of 45 degrees and make a step up of 0.3.
Let's stop the game and add a slope and some steps.
We'll click on the plus button on the hierarchy and select 3D Object->Cube, and we'll set the transform as follows
Next we'll add some steps.
We'll create another cube and set the Transform as follows
We’ll then add another cube, and set the Transform of this one as follows
Now we have some steps and a slope, let's press play to try it out.
You can see that our character can go up the steps and can go up the slope.
Now let's see what happens if we change the slope and step values.
If we select the character in the hierarchy and lower the slope limit to 30, the character can no longer go up the slope.
If we lower the step offset to 0.1, the character can no longer go up the steps.
Using the Character Controller has given us the foundations for our character movement. In future posts, we'll look at how we can add other movements, such as jumping, so subscribe so you don’t miss out.
That covers everything for this tutorial. We hope that you found it useful. Please leave any questions or feedback in the comments below, and don't forget to subscribe to get notified when we publish our next post.
Thanks.


Comments
Post a Comment