Infinite Bounce - Unity Game Development Tutorial

We'll add a cube to the scene by clicking the plus button in the hierarchy and selecting 3D Object->Cube.

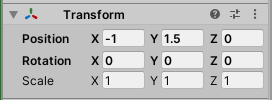
We'll set the Transform for the cube as follows.

Next, we'll create a material to change the colour of the cube. To do this we’ll click on the plus button on the Project panel and select Material. We’ll name this material 'Green'.
We'll then click on the box next to Albedo in the Inspector panel, and choose a green colour.

We can now drag the material onto the Cube to assign it.

We're now going to get a ball from the asset store by selecting Window->Asset Store from the main menu.
We'll then search for 'Low Polygon Soccer Ball', and download and import this free asset.

We’ll then head back to the scene view.
In the Project panel, we'll navigate to Assets->Soccer Ball->Prefabs, and we'll drag the Soccer Ball into the scene.
We’ll set the Transform of the ball as follows.

To have the ball react to forces and collisions we need to add a Rigidbody by clicking 'Add Component' and searching for the Rigidbody component.

Next, we'll move the camera forward a bit so we can get a better view. To do this, we'll select it in the hierarchy and set the Transform as follows.

While we're on the camera, we'll also set the 'Clear Flags' value to 'Solid Color'

To improve the lighting in our scene we'll select Window->Rendering->Lighting Settings from the main menu, and then we'll tick the 'Auto Generate' check box.

Let's press play to see how the ball behaves.

It falls under gravity but there is no bounce.
The bounciness of an object in Unity is defined by its physics material. At the moment the ball is using the default material which has a bounciness value of 0.
Let's stop the game and add a new Physics Material by clicking the plus button in the Project panel and select 'Physic Material'. We'll call this material Ball.

We'll set the bounciness to 1 in the Inspector panel.

We'll then drag the material onto the ball, and press play again.

This time the ball bounces a few times before coming to a stop.
This is quite realistic behaviour for a ball and these settings will work well for many scenarios. But what if we want the ball to keep bouncing indefinitely?
Let's stop the game and have a look at the physics material again.
You'll notice that the bounce combine value is set to Average.

As our floor has a bounciness of zero, the average bounciness of a collision between the ball and the floor will be 0.5, which is why the ball bounces roughly half as high with each bounce.
If we set the value of the bounce combine to Maximum, the bounce will then use the highest value for the bounciness, which in this case will be one.
As we want the ball to keep going forever we don't want it to be slowed down by friction, so we'll also set the friction values to zero, and we'll set the Friction Combine value to Minimum.

Let's press play again to see how the ball's behaviour has changed.

The ball will now keep bouncing forever, but you'll probably notice that it is actually getting higher and higher.
Let's stop the game again and change the bounciness value to 0.965. This seems to be the value that keeps the ball bouncing forever at a consistent height.

Let's press play again to test this out.

Great, that's given us the effect we wanted.
Next, we'll make things a bit more interesting by adding a couple more obstacles to bounce off.
We'll stop the game and then duplicate the cube by right clicking it in the hierarchy and selecting Duplicate.

We'll set the Transform of the new cube as follows.

We'll then duplicate the cube again and set the Transform of this one as follows.

Now we have two walls to bounce off, we need to apply a force to the ball to make it move horizontally. To do this we'll add a new script component to the ball, which we'll call StartForce.

We'll double click the script to open it in Visual Studio and change it to match the following.
using UnityEngine;

public class StartForce : MonoBehaviour
{
    public Vector3 startForce;

    void Start()
    {
        Rigidbody rigidbody = GetComponent<Rigidbody>();
        rigidbody.AddForce(startForce, ForceMode.Impulse);
    }
}
We've added a public Vector3 variable for the desired start force we want to apply to the ball. Then, in our Start method, we're getting the Rigidbody component and assigning it to a variable. We're then adding the desired force to the Rigidbody. We're specifying the ForceMode as Impulse so that the force is applied instantly.
Let's save the script and switch back to Unity.
We'll select the ball in the hierarchy and set the start force value to 2 on the X axis.

Let's press play to see what happens now.

The ball bounces towards the wall but then it doesn't bounce off as you would expect. This is because Unity has a default bounce threshold of 2, and any contact with a relative velocity lower than this will not bounce.
Let's stop the game and change this.
We'll select Edit->Project Settings from the main menu. We'll then go to the Physics tab and change the bounce threshold to 0.

Let's start the game again.

This time the ball bounces off the wall, and it will continue bouncing around our scene indefinitely.
Let’s stop the game and add in a couple more balls.
We'll duplicate the ball by right clicking it in the hierarchy and selecting Duplicate. We'll change the Transform of the new ball as follows.

We'll also change the start force to -3 on the X axis so that it moves in the opposite direction.

We'll duplicate the ball one more time and set the Transform as follows.
We'll also increase the start force slightly to 3 on the X axis.

Let's press play to see how the balls now interact with each other.

You can see that we're now getting all sorts of interesting collisions between the balls that change their direction and velocity, but due to our physics settings there is no loss of energy and they will continue to bounce forever.
That covers everything for this tutorial. We hope that you found it useful. Please leave any questions or feedback in the comments below, and don't forget to subscribe to get notified when we publish our next post.
Thanks.


Comments
Post a Comment