Recentre the Camera on Key/Trigger Press Using Cinemachine - Unity Game Development Tutorial
In this Unity tutorial, we're going to look at how we can use Cinemachine to recentre the camera when a key or the right trigger of the gamepad is pressed.
You can either watch the video version below or continue reading for written instructions.
In a previous tutorial, we showed how to create a third person camera using Cinemachine. In that tutorial, we set up the camera to automatically recentre, to face the direction the character is moving after a period of time.
We're going to change this behaviour to have the camera recentre when a key or the right trigger of the gamepad is pressed.
The first thing we need to do is select the virtual camera in the Hierarchy, and disable the 'Recenter to Target Heading' setting.
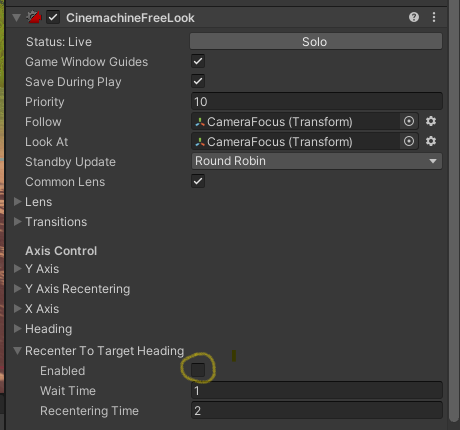
This will stop the camera automatically recentering.
While we're here, we’ll also change some of the other settings.
When we press the button, we want the camera to recentre immediately, so we’ll set the 'Wait Time' to zero. We'll also reduce the 'Recentering Time' to 0.5, to speed up the time it takes to recentre.

Next, we'll configure the input we want to use to recentre the camera. To do this, we'll select Edit, 'Project Settings' from the main menu. Then we'll select the Input Manager.

We'll add a new input binding by expanding the Axes and increasing the Size value.
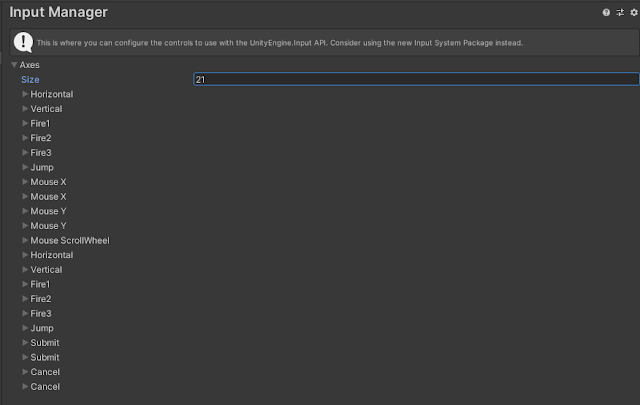
This will add a new entry at the end.
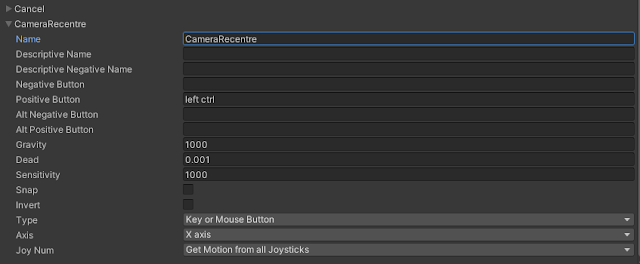
We’ll rename this ‘CameraRecentre’. Then we'll assign the left control key as the positive button, and remove the entry for the alternative positive button.
Next, we'll add an input binding for the gamepad right trigger.
We'll increase the Size field again, which will create a duplicate of the previous binding.
In this new binding we'll remove the entry for the positive button. Then we'll change the type to 'Joystick Axis', and we'll change the axis to the 10th axis.
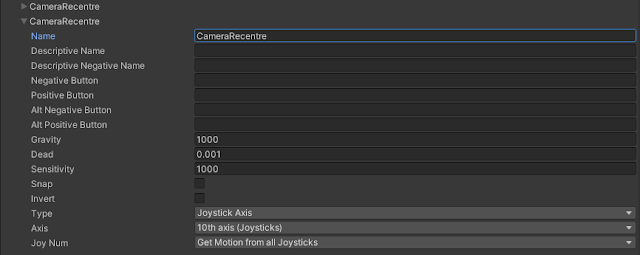
This will be the right trigger on the gamepad we're using. It may be different for different gamepads, so just play about with different settings if it doesn't work.
Next, we'll create a script to enable the camera recentreing.
We'll navigate to the Scripts folder in the Assets folder. Then we'll click the plus button and create a new script.
We'll name this 'CameraRecentre'. and we’ll drag this script onto the virtual camera in the Hierarchy.

Now, let's double click the script to open it in the editor.
We’ll start by adding the Cinemachine namespace.
using UnityEngine;
using Cinemachine;

public class CameraRecentre : MonoBehaviour
{
    ...
Then, we'll add a private field for the Cinemachine Freelook Camera component.
using UnityEngine;
using Cinemachine;

public class CameraRecentre : MonoBehaviour
{
    private CinemachineFreeLook camera;

    ...
In the Start method, we'll get this component and assign it to the field.
using UnityEngine;
using Cinemachine;

public class CameraRecentre : MonoBehaviour
{
    private CinemachineFreeLook camera;

    void Start()
    {
        camera = GetComponent<CinemachineFreeLook>();
    }
...
Then, in the update method, we'll get the axis value for the new 'CameraRecentre' input we created. If the value is one, it means the left control key or the right trigger has been pressed. If that’s the case, we’ll enable the ‘Recenter To Target Heading’ setting on the camera.
using UnityEngine;
using Cinemachine;

public class CameraRecentre : MonoBehaviour
{
    private CinemachineFreeLook camera;

    void Start()
    {
        camera = GetComponent<CinemachineFreeLook>();
    }

    void Update()
    {
        if (Input.GetAxis("CameraRecentre") == 1)
        {
            camera.m_RecenterToTargetHeading.m_enabled = true;
        }
    }
}
We'll then add an else statement to turn this off again when the key or trigger is released.
using UnityEngine;
using Cinemachine;

public class CameraRecentre : MonoBehaviour
{
    private CinemachineFreeLook camera;

    void Start()
    {
        camera = GetComponent<CinemachineFreeLook>();
    }

    void Update()
    {
        if (Input.GetAxis("CameraRecentre") == 1)
        {
            camera.m_RecenterToTargetHeading.m_enabled = true;
        }
        else
        {
            camera.m_RecenterToTargetHeading.m_enabled = false;
        }
    }
}
Let’s save the script and switch back to Unity to try this out.

Now, the camera realigns if we press the left control key or the right trigger of the gamepad!
That covers everything for this tutorial. We hope that you found it useful. Please leave any questions or feedback in the comments below, and don't forget to subscribe to get notified when we publish our next post.
Thanks.


Comments
Post a Comment