Rotating Around a Point - Unity Game Development Tutorial
In this Unity game development tutorial we'll be looking at how to rotate a game object around a point.
We'll get started by creating a new 3D project in Unity Hub.
We’re going to make use of an asset from the asset store to help demonstrate this. To open the asset store we’ll click on Window->Asset Store from the main menu.
Now, we’ll search for "Poly Planets", and find the free asset shown below.
We'll select it and click import to load it into our project.
We now have several planet prefabs in the project panel we can make use of.
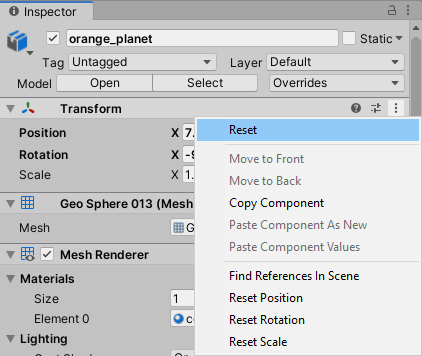
Let's choose the one called orange_planet, and drag it into the scene. We’ll then reset it’s transformations by clicking the three dots next to Transform in the Inspector panel and selecting Reset.
Now that we have a planet in the scene, let’s make it rotate with a very simple script.
We’ll click on the 'Add Component' button in the Inspector panel, search for script and click 'New Script'. We'll call the new script Rotate.
The script will now appear in the Project panel. We’ll double click it to open it in Visual Studio, and we'll change it to match the following.
using UnityEngine;

public class Rotate : MonoBehaviour
{
    public float rotationSpeed;

    void Update()
    {
        transform.Rotate(new Vector3(0, rotationSpeed, 0) * Time.deltaTime);
    }
}
We have added a public variable to allow the rotation speed to be set from the Inspector panel. In the Update method we are making use of use of the Transform.Rotate method to make the planet rotate around the Y axis. We're supplying a vector that specifies how much rotation we want, which is zero on the X and Z axis and our rotationSpeed on the Y axis. Then we multiply by Time.deltaTime to ensure that it rotates at the same speed regardless of our frame rate.
Let's save the script and switch back to Unity. We'll then set the rotation speed in the Inspector panel to 10.
If we now switch to the Game tab and press play we’ll see the planet slowly rotating.
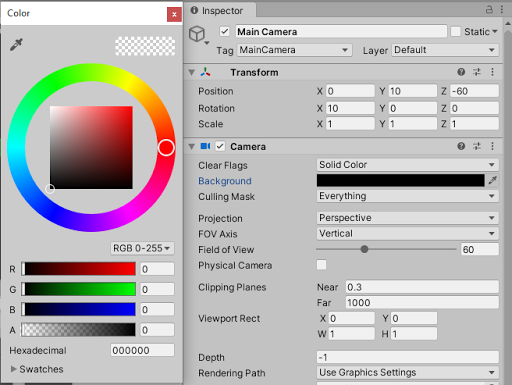
Before we go any further lets move the camera so that it isn't so close to our planet. To do this we'll select the camera in the Hierarchy panel, and set its Transform in the Inspector panel to the following values.
Let's also set the Clear Flags value of the camera to Solid Color
For the background colour we'll choose black to make it look a bit more like space.
Our planet is looking a bit dark and is blending into the background
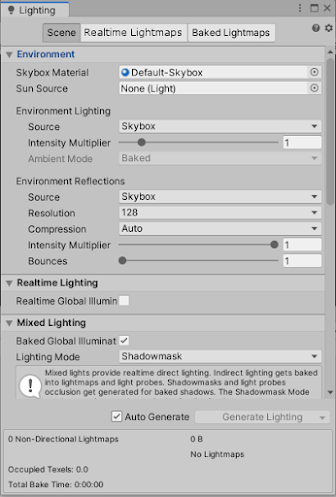
To brighten it up we'll select Window->Rendering->Lighting Settings from the main menu, and then we'll tick the 'Auto Generate' check box.
This will cause the lighting to be regenerated every time we make a change, and will make things look a lot brighter.
Now we want to add another planet that rotates around this one. We’ll look at a couple of ways to do this. The first is to add a planet as a child of this one. To do this we’ll drag the ice_gray planet from the project panel on to the orange_planet in the hierarchy.
We’ll reset the transformation of the new planet and then set the position to 20 on the X axis.
If we press play again now, the new planet will rotate around the original one.
This is because the rotation of the parent planet is being applied to the new child planet.
We can also add some rotation locally to the new planet. To do this, we’ll Click on 'Add Component' and add our Rotate script.
Let's set the rotation speed to -100.
If we click play again, the planet now rotates around its local Y axis as well as rotating around its parent.
While this method works, the rotation of the two planets is directly linked. If we wanted the planet to rotate around its parent any faster we would need to increase the rotation of the parent itself.
We’ll look at another option now that gives us a bit more flexibility. Let’s switch back to the scene view and drag the planet named havay into the scene. We’ll reset the transformation and set its position to 40 on the X axis.
We’ll add our rotate script to this planet as well, and then set it’s rotation speed to -50.
If we press play now, the new planet spins on the spot but doesn’t move. To have it rotate around the central planet we’ll add another script component which we'll call RotateAroundPoint.
We'll change the code to match the following.
using UnityEngine;

public class RotateAroundPoint : MonoBehaviour
{
    public float rotationSpeed;
    public GameObject pivotObject;

    void Update()
    {
        transform.RotateAround(
            pivotObject.transform.position,
            new Vector3(0, 1, 0),
            rotationSpeed * Time.deltaTime);
    }
}
This is very similar to our previous script. We have a public variable to hold the rotation speed again, but we also have a variable to hold the object we want to rotate around.
In the Update method we're making use of the the Transform.RotateAround method to rotate around the pivot object. The first parameter is the pivot point, which we’ve set to the position of our pivot object. The second parameter is the axis to rotate on, which we’ve set to be the Y axis. The final parameter is the angle to rotate which we’ve set to our rotationSpeed multiplied by Time.deltaTime.
Let's save the script and switch back to Unity. We'll set the rotation speed for our new script to 15, and we'll drag the orange_planet from the Hierarchy panel into the the Pivot Object slot.
When we press play now, the new planet rotates around the orange_planet but at a faster rate than the ice_gray one, completely independent of the rotation of the orange_planet.
That covers everything for this tutorial. We hope that you found it useful. Please leave any questions or feedback in the comments below, and don't forget to subscribe to get notified when we publish our next post.
Thanks.









Comments
Post a Comment